How to get around NAT's constraints by using a single SSH server with a publicly accessible IP address.
Last Modified: June 28th, 2022 | Reading Time: 5 minutes
SSH (Secure Shell Protocol) is a widely-used protocol for securely accessing a remote shell.
In order for the client to connect to an SSH server, the server’s TCP port 22 must be directly reachable by the client.
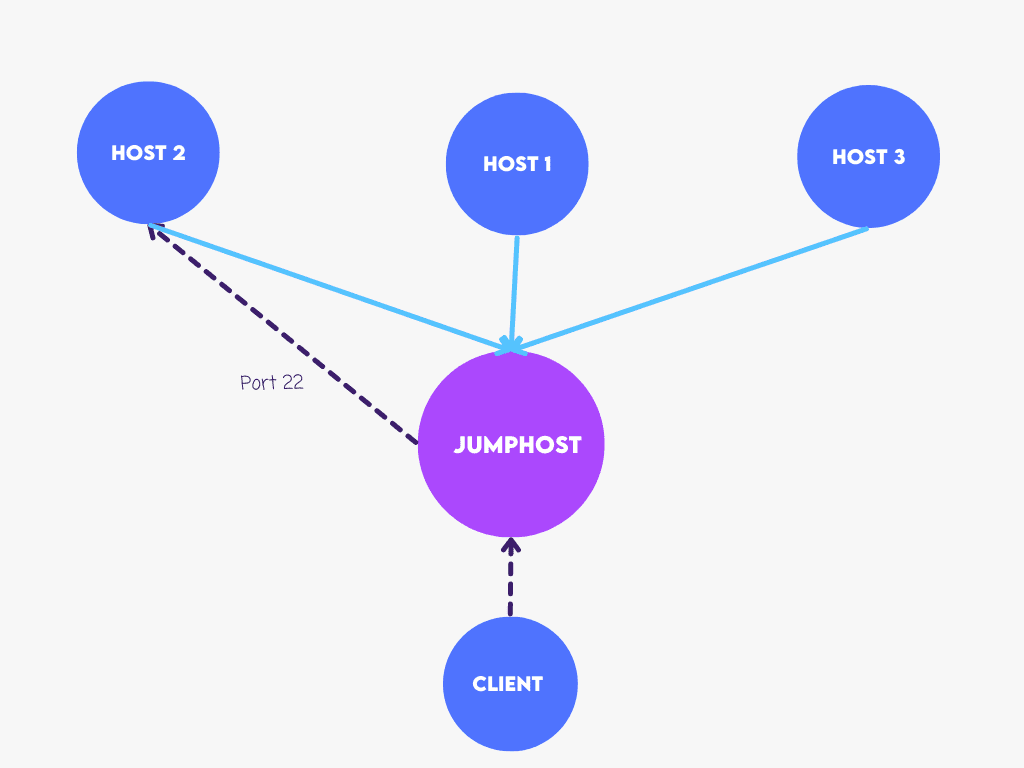
Unfortunately, due to the widespread use of NAT (Network Address Translation), most computers connected to the internet do not have a publicly-reachable IP address. The simplest way to overcome this limitation is to use a single SSH server with a publicly-reachable IP address and use it as a reverse-jumphost for connecting to all other hosts behind NAT:
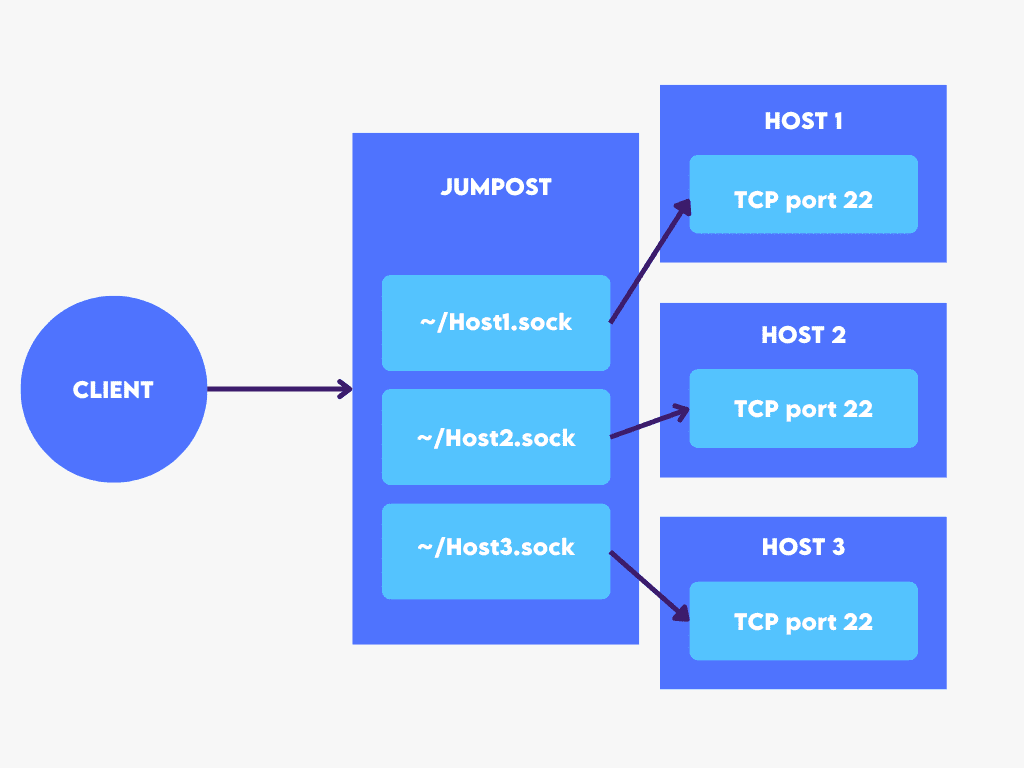
SSH has a neat feature: it can forward connections from one host’s UNIX socket to another’s TCP socket.
Since all we need to connect to an SSH server is access to TCP port 22, this capability will serve as the foundation for our reverse SSH jumphost — because UNIX sockets are merely files on the filesystem, we can construct a new UNIX socket for any host we want to connect to through the jumphost. We’ll have a handy way to connect to hosts by their hostname if we name each socket after the hostname it connects to:
ProxyCommand is another useful feature of SSH; the input to this option is used as a command to connect to the server. The following is an excerpt from the manpage:
The command can be basically anything and should read from its standard input and write to its standard output. It should eventually connect an SSHD server running on some machine.Since each connected host forwards connections from its UNIX socket to its TCP port 22, we can use netcat (nc -U /path/to/socket) as ProxyCommand to connect to the host.
The steps to set up reverse jumphost on our SSH server are as follows:
authorized_keys file to /home/host/.ssh/ directoryPasswordAuthentication=no)StreamLocalBindUnlink=yes)StreamLocalBindMask=0111)The configuration that should be put in /etc/ssh/sshd_config is the following:
Match User host
  PasswordAuthentication no
  StreamLocalBindUnlink yes
  StreamLocalBindMask 0111
(s)hell commands are provided below:
# Install "netcat" package (assuming Debian-based distribution)
sudo apt-get -y install netcat
# Create a new "host" user with disabled password login
sudo adduser --disabled-password host
# Copy authorized_keys file to "host" user to allow client login
sudo -u host mkdir -p /home/host/.ssh
cat .ssh/authorized_keys | sudo -u host tee /home/host/.ssh/authorized_keys
# Append configuration to /etc/ssh/sshd_config
printf 'Match User host\n\tPasswordAuthentication no\n\tStreamLocalBindUnlink true\n\tStreamLocalBindMask 0111\n' | sudo tee -a /etc/ssh/sshd_config
# Restart SSH server
sudo systemctl restart ssh
Each host must redirect connections from a UNIX socket on the server to its own TCP port 22 in order to be accessible through the server. We can create a systemd service to make the connection persistent.
For convenience, we can use the hostname of a host as a UNIX socket identification.
Setting up a persistent host tunnel requires the following steps:
Restart=always) with a 5-second timeout (RestartSec=5)StartLimitIntervalSec=0)-N)-R /home/host/HOSTNAME.sock:localhost:22)-o ExitOnForwardFailure=true)-o ServerAliveInterval=10)For step 1. we need to copy the host’s SSH public key (.pub file) to the client machine (the one that can access the server) in order to authorize the host’s public key with the server’s “host” user.
Assuming the host public key is copied to a client’s working directory (./id_rsa.pub), the shell command for step 1. is the following (NOTE: this needs to be executed on the client machine):
# Force-authorize new key for the user "host" on the server "SERVER"
ssh-copy-id -f -i ./id_rsa.pub host@SERVER
NOTE: Replace the “SERVER” with your server hostname or address.
For step 2. we need to write a systemd unit file. The configuration for the unit file is the following:
[Unit]
Description=Run reverse SSH jumphost
StartLimitIntervalSec=0

[Service]
User=USERNAME
Restart=always
RestartSec=5
ExecStart=/usr/bin/ssh -N -R /home/host/HOSTNAME.sock:localhost:22 -o ExitOnForwardFailure=true -o ServerAliveInterval=10 host@SERVER

[Install]
WantedBy=multi-user.target
NOTE: Replace the “USERNAME” with the appropriate username of the host, “HOSTNAME” with the proper hostname of the host, and “SERVER” with your server hostname or address.
To enable the system service, write the above configuration to /etc/systemd/system/reverse-jumphost.service on the host machine, then execute:
# Reload configuration files
sudo systemctl daemon-reload

# Start reverse-jumphost service
sudo systemctl start reverse-jumphost.service

# Enable reverse-jumphost service to run on reboot
sudo systemctl enable reverse-jumphost.service
Now, presuming we’ve configured our hosts and server correctly, all that’s needed is to configure the client.
We can use the following SSH arguments to automatically use our jumphost when connecting to any of the hosts (e.g. Host1, Host2, Host3 etc.)
ProxyCommand - allows us to specify a command that connects to the host's TCP port 22 - SSH will use the command's standard input/output instead of creating its own TCP connectionServerAliveInterval - tells SSH client to send heartbeat periodically and close the connection if the server does not respond - we expect network interruptionsUser - specifies a username for the specified hostHostname - specifies a hostname for the specified host (since we're using ProxyCommand, this will only serve an aesthetic purpose in logs)Host Host1 Host2 Host3 ...
ProxyCommand ssh SERVER nc -U /home/host/%h.sock
ServerAliveInterval 10
Hostname %h
Host Host1
User User1
Host Host2
User User2
Host Host3
User User3
.
NOTE: Replace the “SERVER” with your server hostname or address, and “Host1/User1”, “Host2/User2”, … with the appropriate Hostname/Username pairs.
If everything is configured correctly, we can now connect to our hosts as if they were on a local network:
$ ssh Host2
The authenticity of host 'Host2 (<no hostip for proxy command>)' can't be established.
ECDSA key fingerprint is SHA256:${FINGERPRINT}.
Are you sure you want to continue connecting (yes/no/[fingerprint])? yes
Warning: Permanently added 'Host2' (ECDSA) to the list of known hosts.
User2@Host2's password:
The UNIX-socket-to-TCP-port-22 forwarding is the key concept. This technique does not require any port-mapping bookkeeping because UNIX sockets are files on the filesystem and can have proper filenames. It should be able to handle thousands of devices without trouble, assuming adequate network capacity.
All other hosts can use the same SSH key as the one we previously configured for reduced host/server configuration in trusted environments.
For reduced client configuration, all hosts can have the same username and have the same common prefix in the hostname (e.g. host-1, host-2, ...), making the client configuration simple:
Host host-*
    ProxyCommand ssh SERVER nc -U /home/host/%h
    ServerAliveInterval 10
    Hostname %h
    User USERNAME
For better security, the host user's SSH shell could be disabled by adding the following lines to the /etc/sshd_config file:
Match User host
    ForceCommand /sbin/nologin
